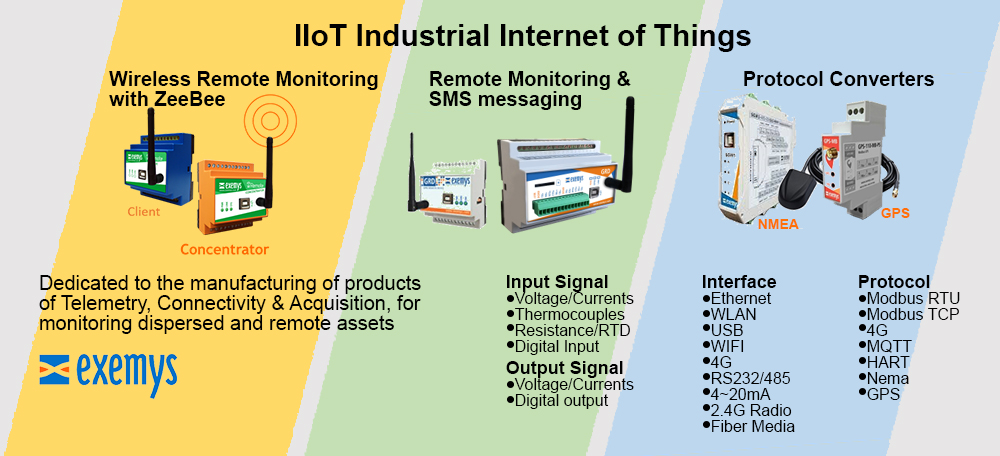

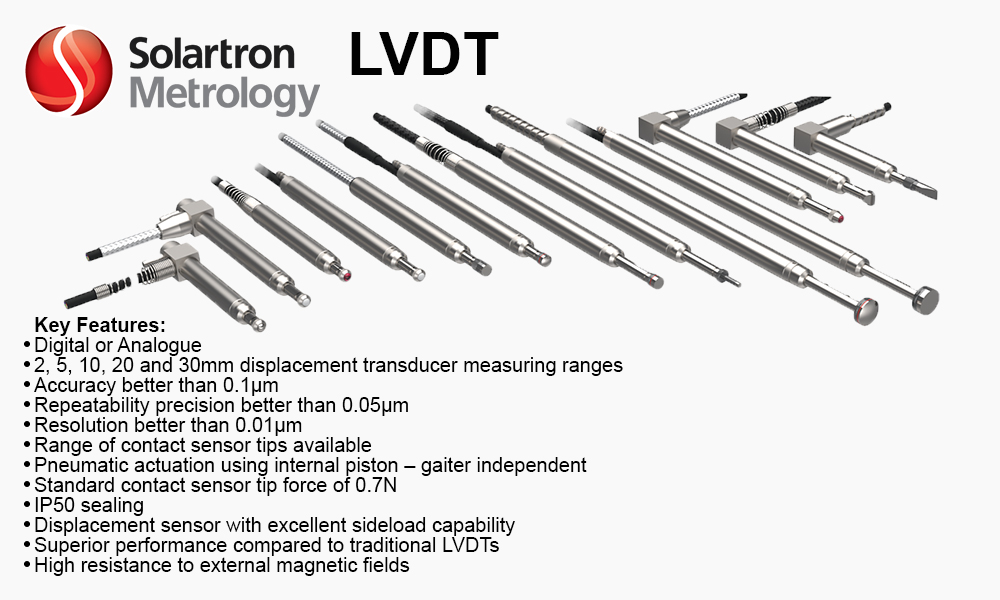


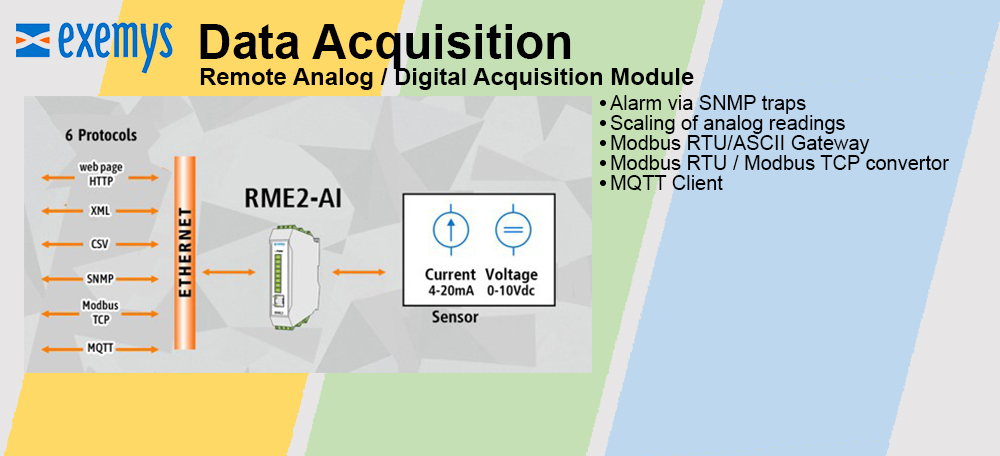


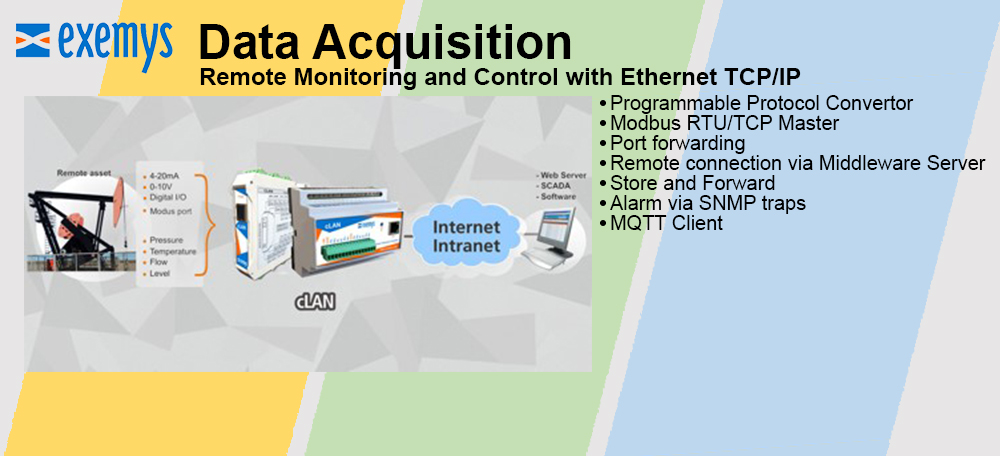
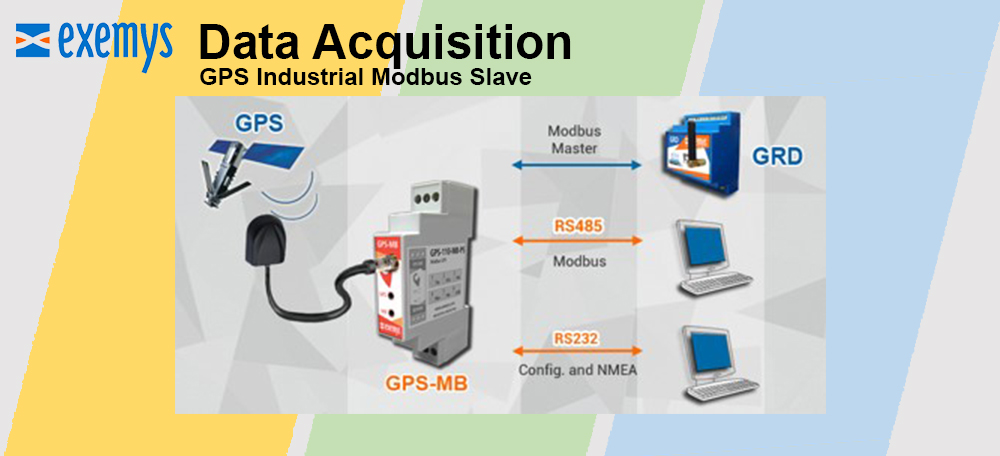
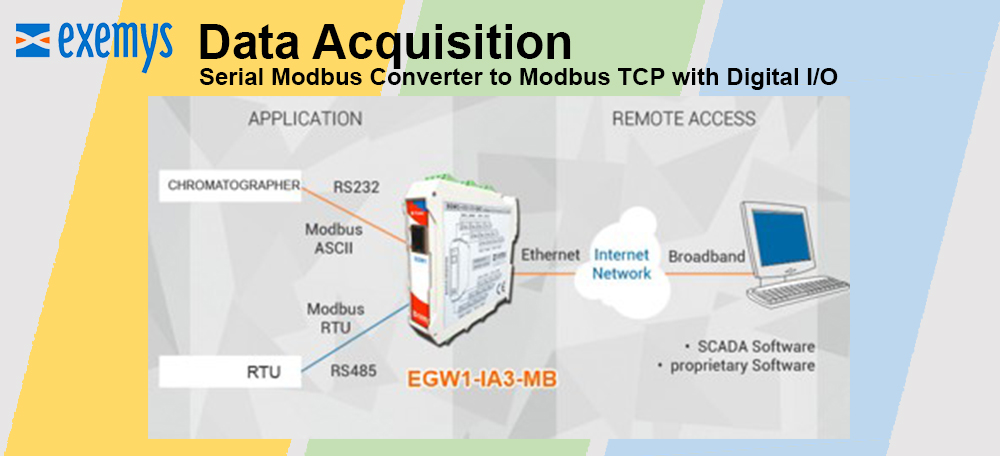

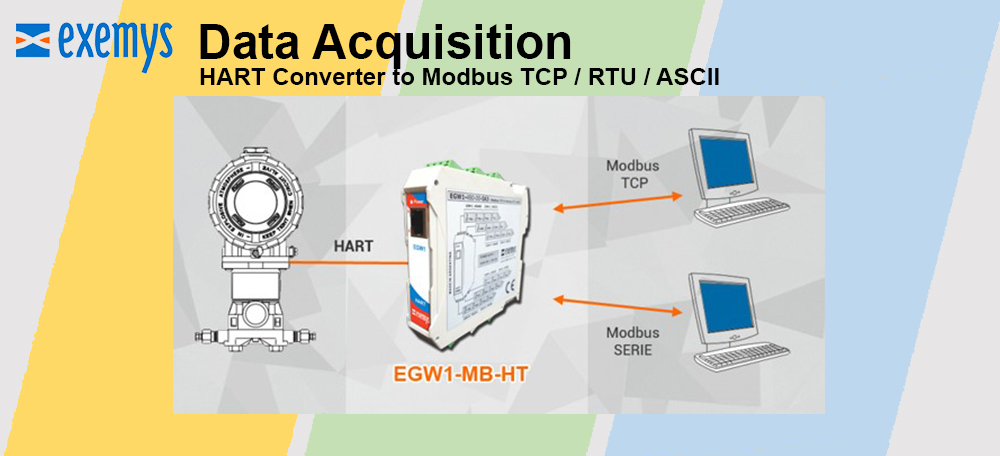
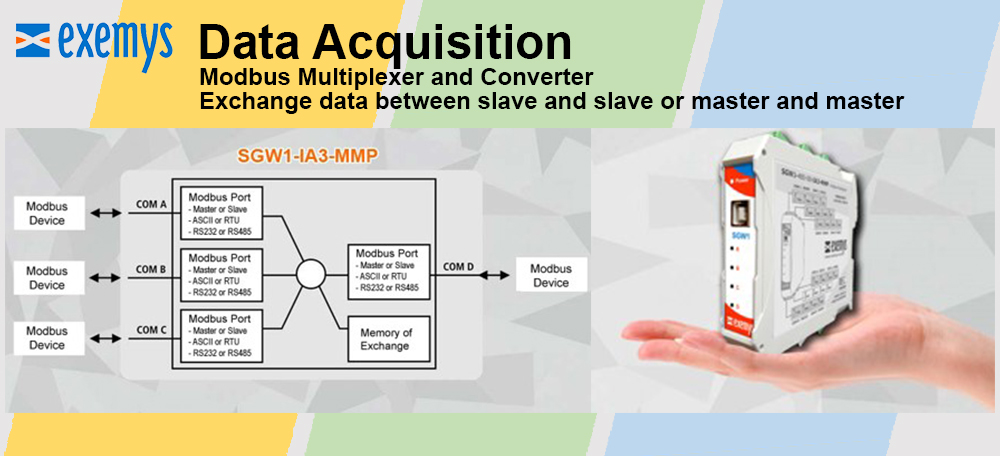
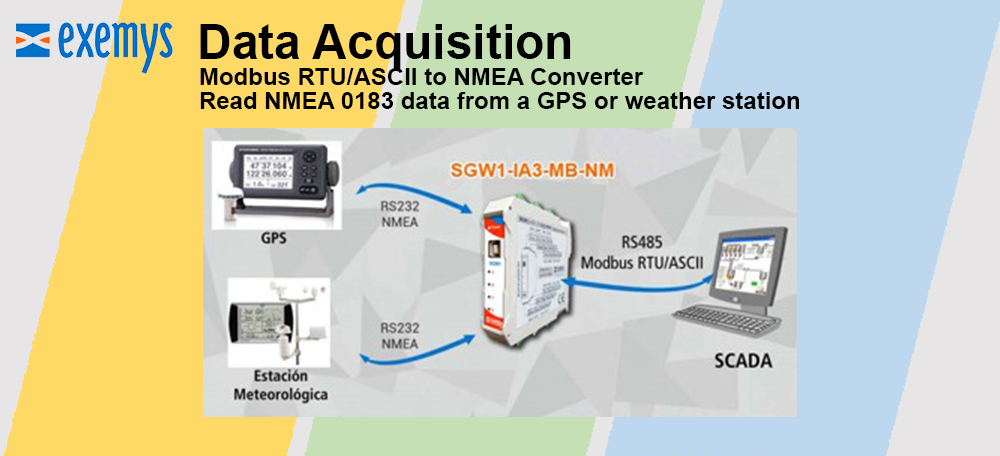
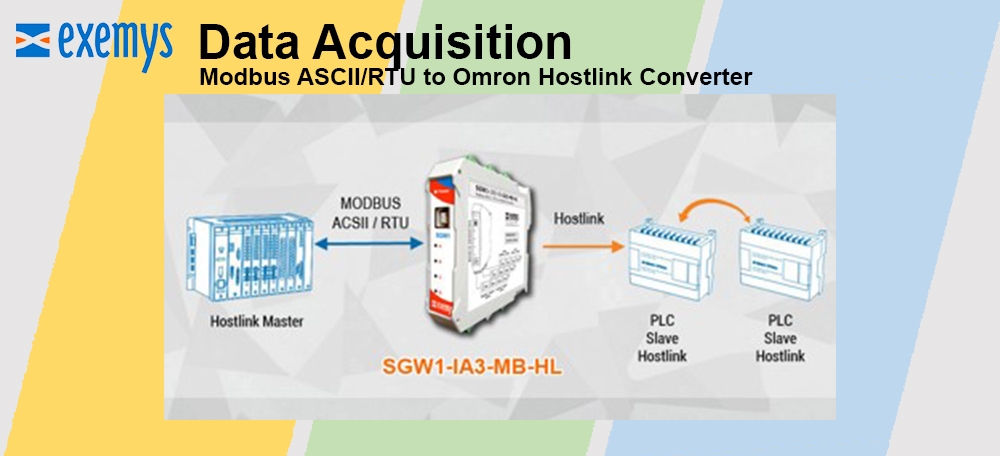
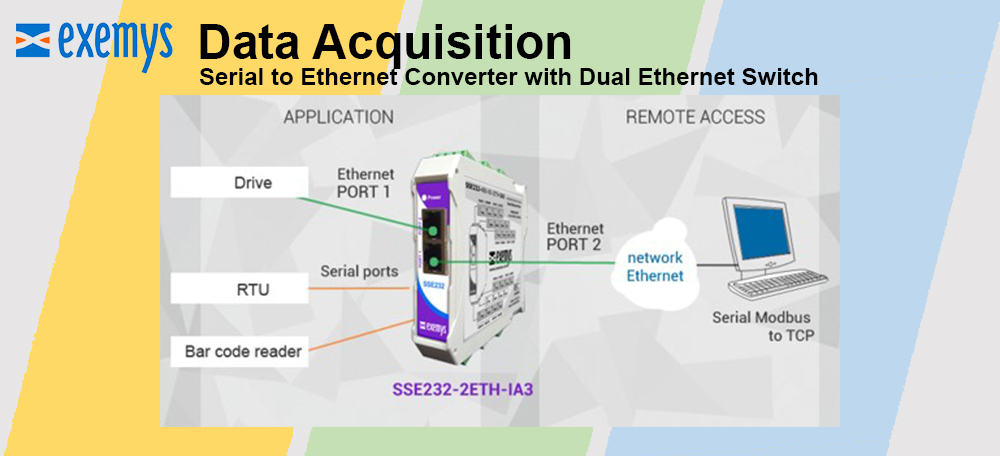
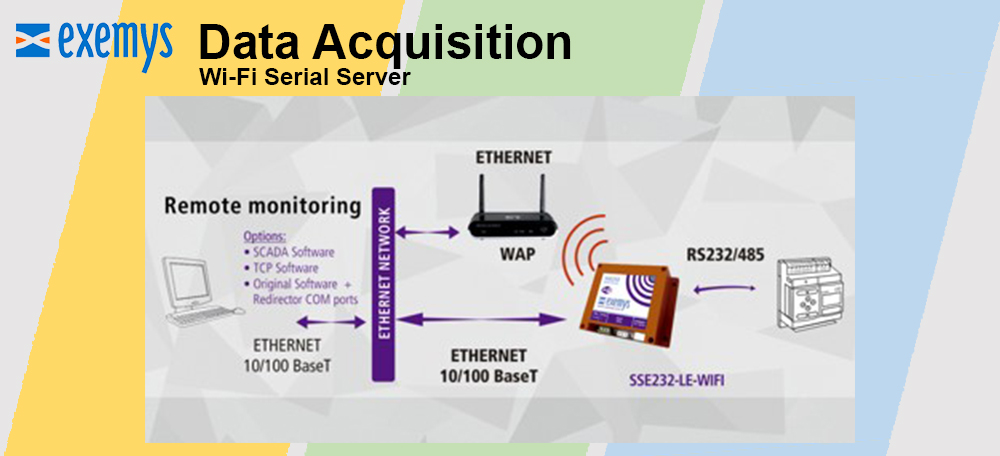

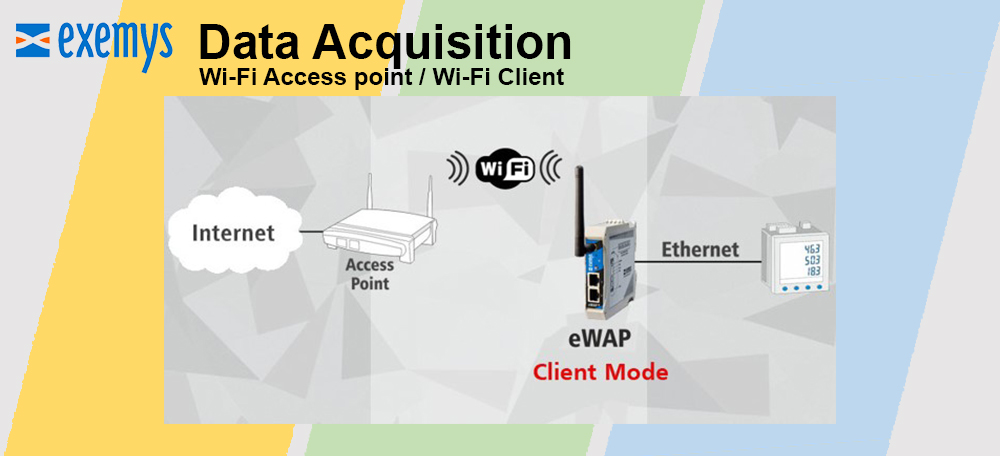
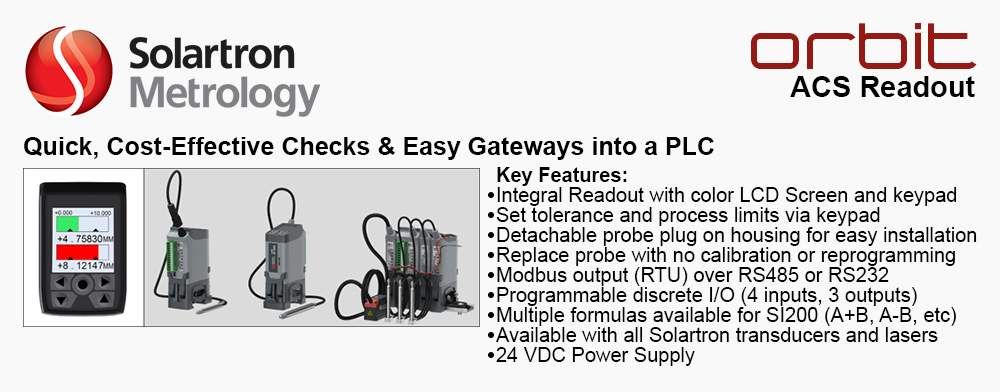
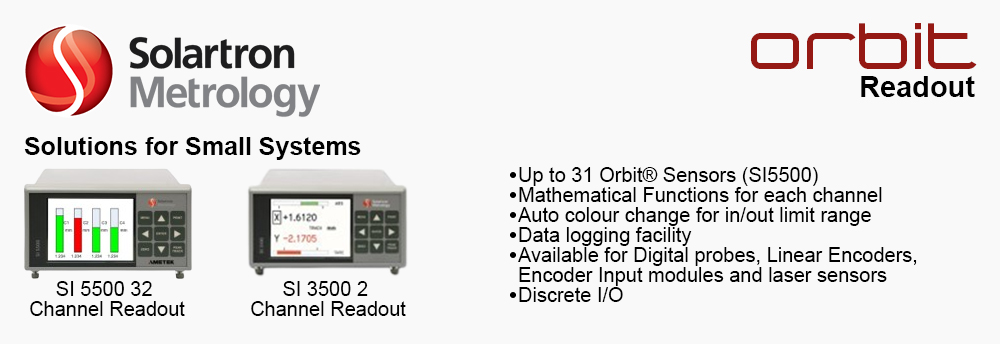


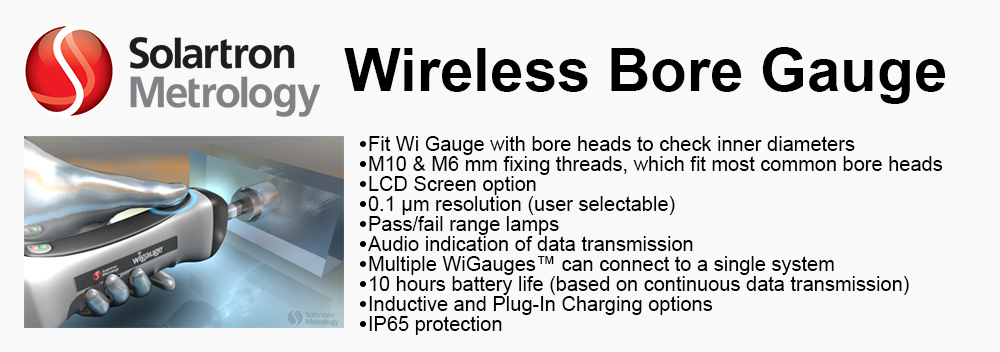
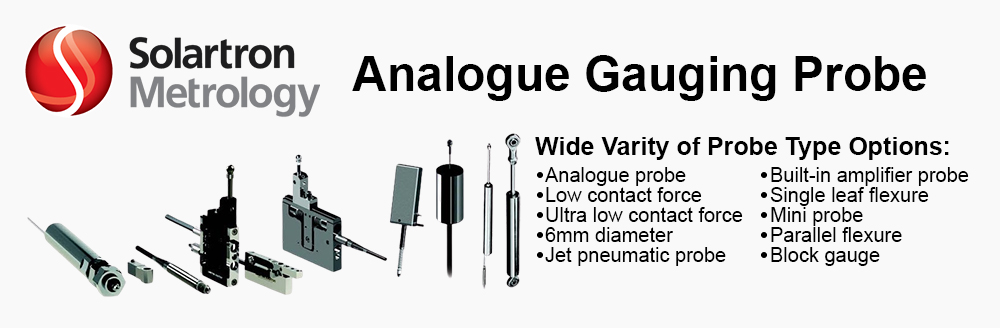

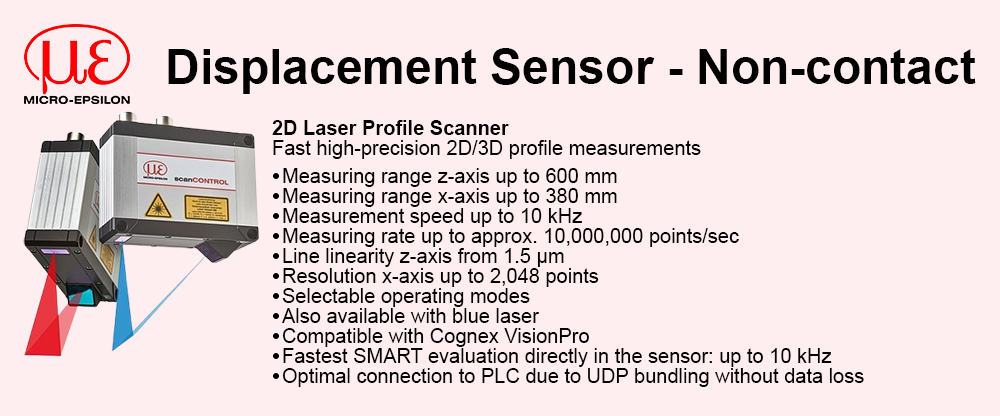


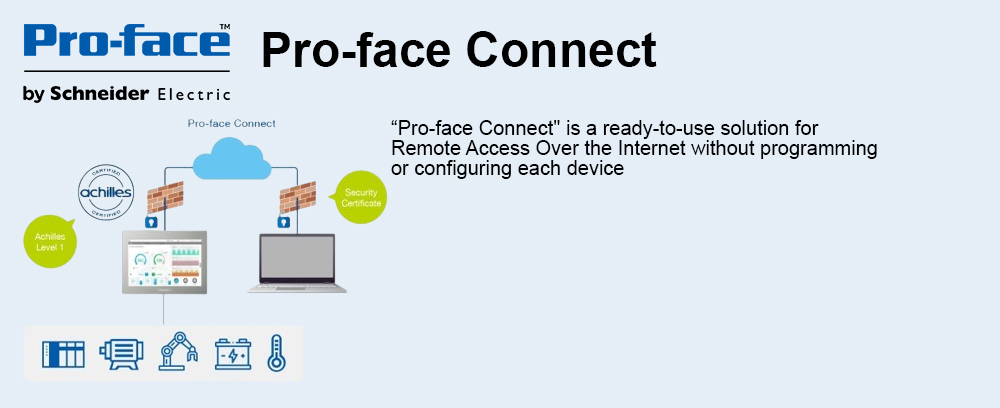
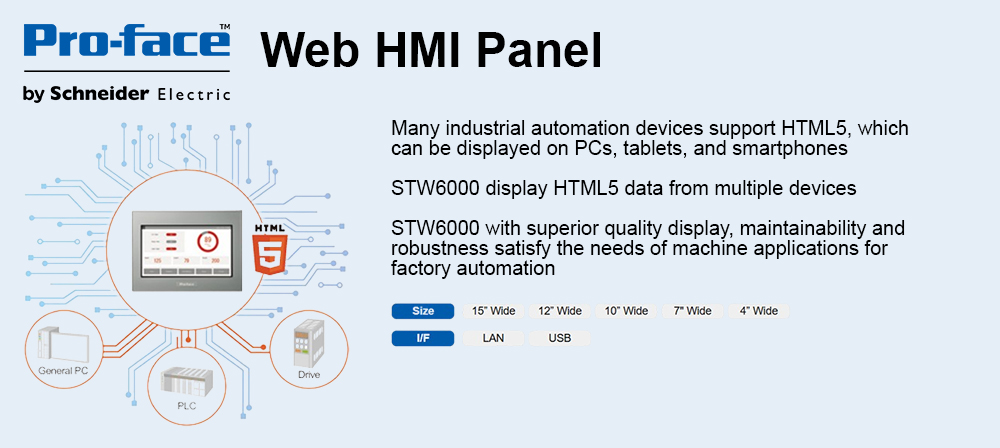
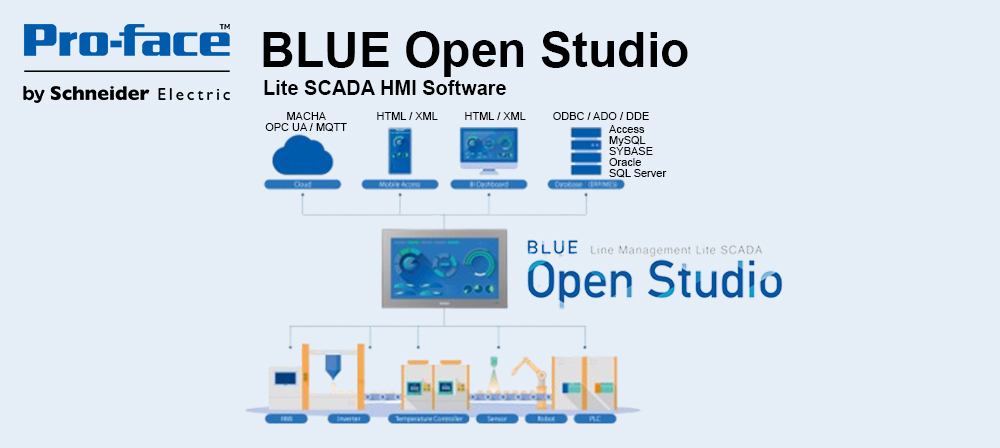
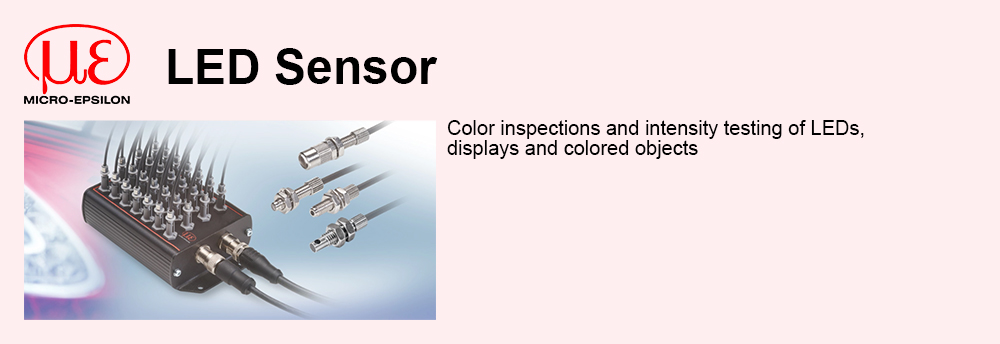


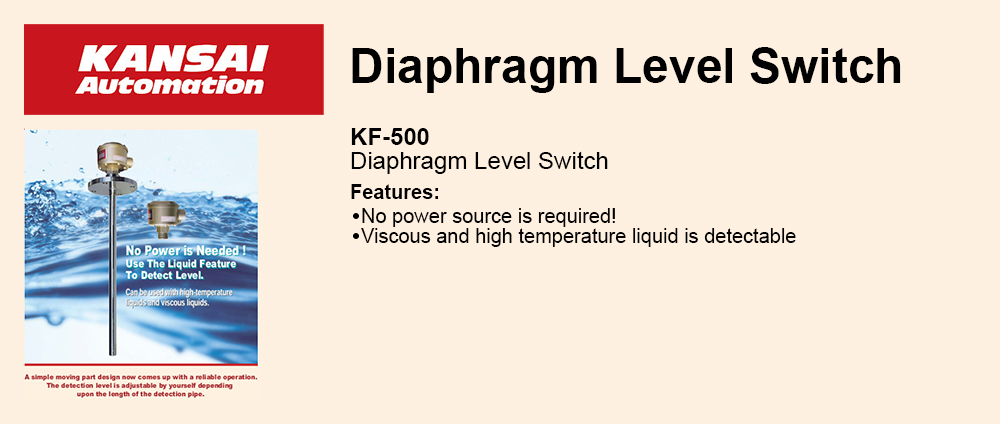
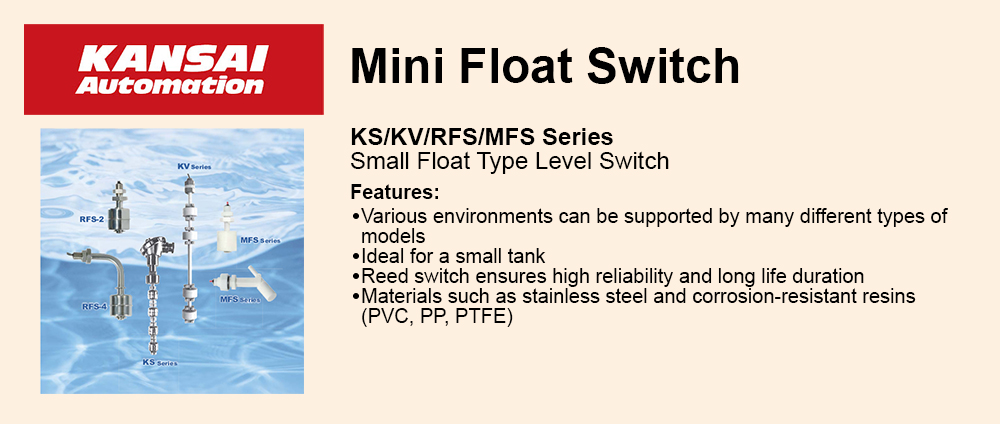


Leading the way in HMI Design 4.0 |
| Good screen design cannot be taken lightly. It is essentially vital because it has a direct and positive impact on operational efficiency. However, since the introduction of the HMI nearly 40 years ago, designing screens is a time-consuming process that requires specialized skills and expertise. Now, new screen design software is simplifying this process and dramatically reducing the time it takes to design effective screens. New layouts and templates are giving users newfound freedom and flexibility to create a better interface, faster. |
A brief history of HMI designHMI Design 1.0 Back in the 80s, to create a graphical interface for machine and equipment, you had a programmable display unit – hereafter referred to as an HMI – together with some primitive programming software. Before the advent of software created exclusively for HMI screen design, creating and designing an HMI required computer programming skills and advanced computer knowledge. HMI development and maintenance were time-consuming and expensive (we can call this stage HMI Design 1.0). The introduction of HMI design software reduced the workload to create and maintain screens for the HMI.
HMI Design 2.0 In HMI Design 2.0, there are two parts to the HMI design software. First, a graphical component for drawing the screen display, and second, an operational component for programming screen operations. The operational component required the set up of special commands called screen tags. Configuring these screen tags still required some expertise and there was plenty of room for improvement in both design and operation.
HMI Design 3.0 In the 90s, the Windows operating system opened the door to many possibilities. As industry embraced Windows software applications, HMI design began to integrate the graphical and operational components so that you could simply change the properties or attributes of a graphical part to program your operations. While expertise in HMI design, like tag settings, became unnecessary and creating screens became much simpler, elements such as placing parts and changing attributes remained static for many years and time requirements for HMI design did not reduce significantly.
HMI Design 4.0
Recently, with the introduction of a range of new HMI design methods and concepts, HMI design time has been significantly reduced by doing away with unnecessary steps and re-using previously created resources. In HMI Design 4.0, the design process is simplified, operators are more efficient, and operations are more productive. The table below illustrates the evolution of HMI design through various stages: |
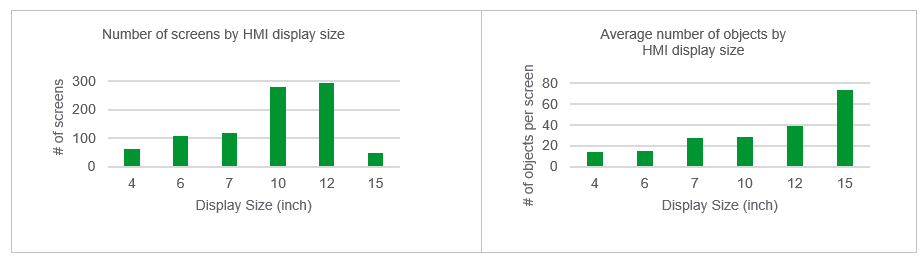
The current state of screen designWhen we analyze how much time is spent on HMI design, statistics show us that the number of screens (base screens) on a large HMI usually exceeds 500. And the number of parts per screen usually exceeds 100. Considering the time and effort it takes to create even a single part, you can see how time-consuming it can be to design HMI screens.
Over 70% of HMI designers use scripts. But surveys show us that the development and maintenance of scripts are a heavy burden for screen designers. 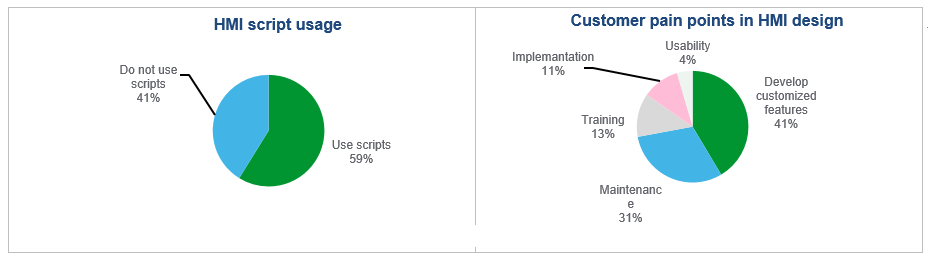
 |
HMI Design 4.0 Part 1: LayoutsTo create screens in conventional HMI design software, you draw parts on pages known as “base screens” which have a resolution that matches the HMI. When drawing these parts, you specify the X and Y coordinates and its width and height, as attributes for the part. These attributes behave like absolute values against the screen resolution. If you want to use the same screen data on another HMI unit with a different screen resolution, you need to adjust the position of every single part. Additionally, if you re-use a portion of the screen elsewhere, you cannot change the relative position of parts on the original screen from the other page, which limits the freedom to create a good layout.
Now available in HMI Design 4.0, layout screens offer a new method of screen design, different from the base screen with no dependence on HMI resolution. The following is an example of the grid layout. The grid layout has rows and columns like a table. When you draw a part on the screen, drop the part into a cell and the part sizes automatically to fit into the cell area. 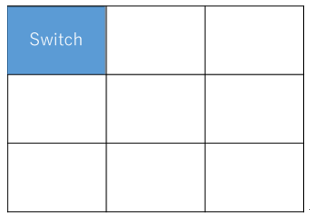 The size of rows and columns on the grid is relative to the resolution of the screen. If the screen resolution changes, the size of rows and columns adjusts accordingly. As a result, it is able to retain the location of parts relative to the original layout. In addition to using a grid layout for an entire screen, you can also apply the grid layout to a portion of a screen with a layout frame. This allows reusing content that you can resize.
Compared to drawing parts on base screens, grid layout screens do not require fine adjustments to locations of parts, making commands such as Align Left and Distribute Evenly wholly unnecessary. This reduces the time required to draw parts on the screen. A simple screen layout with rows and columns can limit the placement of parts. However, with HMI Design 4.0, you can increase screen complexity by combining cells and drawing further grids in one or more cells. This feature considerably increases the degree of freedom offered by layouts. 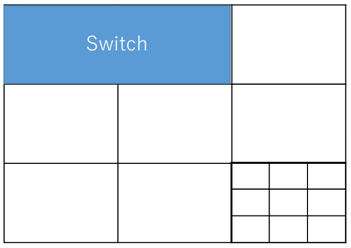
|
The current state of screen designInstead of having to design a screen from scratch, HMI Design 4.0 introduces the concept of templates, with preset features and appearances. You can significantly reduce the time and effort of HMI design by using theme templates to give you a look and feel you want, and color set templates to define the color tone and navigation templates for screen changes. And, because you can change templates even after the HMI design is complete, you can make fine adjustments without disrupting the entire design. <Figure 1: Example themes in Microsoft Windows>
Using theme and color set templates, not only can you design screens faster and with less effort, but also create unified screens instantly with pre-designed, user-friendly, screen options delivered as part of the software package. For example, without the use of color sets and themes, even after you decide all Stop switches will be red, you might end up setting up a different shade of red on every screen. Color sets can prevent this from happening. With the use of themes, you can change the default values of part attributes and then register that attribute for use in other parts. For example, to set the font size for titles in parts to 20 points, which is larger than usual, you can edit the size of a part’s text font to 20 and save it as the default font size of the text for titles. After that, there is no more need to change the font size of the parts.
The number of screens and screen navigation operations may seem simple for small to mid-sized HMI, but the setup for screen change operations is quite complicated. For example, for a change screen switch, you need to specify the destination screen number. Whenever there is a change in screen configuration or a change in the destination screen number, you need to review and edit the settings for all change screen switches. This factor increases the time spent on maintenance. HMI Design 4.0 eliminates this issue with navigation templates. Navigation templates automatically configure screen changes. The design of change screen menus is set up in a template, and screen numbers for screen changes are configured automatically based on the screen structure. You can replace the navigation template with a new one to change the appearance of the menu; however, the screen structure does not change, eliminating the need to review all the screen settings. 
By Manabu Kawata |